There is no denying it, I thoroughly enjoy working with Amazon Web Services (AWS) as a solution.
Since starting with DigitalMaas, I’ve learned to continually look for ways to adopt the latest and emerging technologies to keep ahead of the pack. And that has led me to Serverless.
I’ve worked within several organisations that looked to begin their journey to the cloud with AWS. Every one of these organisations was looking to “lift and shift” their existing topology and migrate it as-is to the cloud. This in itself has inherent problems and limitations. AWS is in its element when you’re building a solution from scratch. If you utilise the services they offer the way they are meant to be used, you can build a robust, highly scalable and redundant system without the need for highly skilled System and IT administrators.
Building a serverless solution doesn’t happen unless you know what NOT to do. Here’s the background how we got to where we are and some of the pros and cons of it all.
A change in the roadmap
Originally, we started building out our Platform with EC2 servers and RDS instances.
Our experience with this option was ok, but there were distinct limitations:
- Administering the Linux Operating Systems was time dominant
- Building our front and backend services proved to be complex
- Existing frameworks were built for 10 years ago, when all you had was a single “do-it-all” server that ran the Database, Backend and Frontend Web Application.
I knew there had to be a better way; and there was.
AWS had just announced that Lambda was coming to our region. The timing was perfect. They’d been on my radar as I’d identified Lambda as a possible solution, but we had disregarded it because it hadn’t been available until now. I studied up on it to see if we could build our application around it and how it would work for us.
The Lambda Solution
Getting started with Lambda is pretty straight forward. The documentation is quite good and the available community resources meant that finding a solution didn’t take much time at all. That said, it soon became apparent that the learning curve was going to be steep and challenging. I had to work out what services were needed, how they worked and how we could setup multiple environments that allowed us to progress code through.
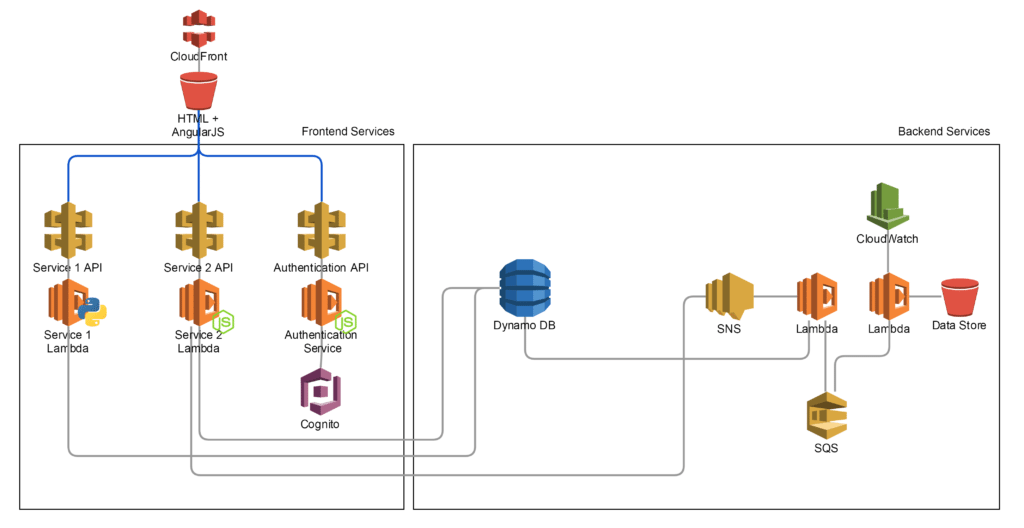
I started looking into how I could create a solution that was broken down into MicroServices. With each MicroService, we had modular groups of API Gateway endpoints and Lambda functions, logically grouped by their function.
Choosing the database engine was a consideration that wasn’t taken lightly. We needed to have a solution that had the ability to change as we developed the application. Schema would not be known for every feature initially, so we needed the ability to add, remove and rename columns/attributes as required. We chose DynamoDB for this as is catered for the changes in schema and our capacity requirements were unknown and DynamoDB gave us the ability to manually scale up and down as required. As an extra bonus, we were blessed after the fact when AWS released AutoScaling for DynamoDB. This meant it would dynamically change the Reads/Writes of each table based on its utilisation.
By then we were heading full steam into a Serverless Backend. We had a REST API triggering Lambda Functions that were reading and writing from DynamoDB tables.
Now for the Frontend.
We were somewhat lucky at this stage. Had we of been using a Server-Side language, developing the frontend application would be extremely hard. Luckily we were using AngularJS for our frontend and converting this to be hosted from an S3 bucket meant we only had to make minimal changes. We decided to utilise CloudFront and pointed it to the S3 bucket as the Origin.
We now had a Frontend and Backend solution running fully serverless. We continued to build out more backend transactional services and adopted more AWS services like SNS (to trigger Lambda), SQS (to handle Jobs) and CloudWatch to schedule and log routine tasks.
During these development efforts it became evident that we needed a way to deploy and maintain consistency throughout each environment. Upon consultation with the AWS solution architects, we decided on having individual AWS accounts for each environment. We now have the following:
- Master Account (Used for common resources)
- Development Account (All developers have access)
- QA Account (Some Developer Access, code can only be deployed via Pull Requests)
- Production (Minimal Access, Code can only be deployed via an approved Pull Request)
Our Deployment Process
We initially used BitBucket with Bamboo pipelines to build and deploy to our original solution. But once we received notice of Bamboo Cloud being ceased, we were forced to look for and alternative solution. Sticking with the Serverless theme, moving to a self hosted version of Bamboo didn’t appeal to me and other solutions like Jenkins, CircleCI, TravisCI, and TeamCity all fit into the same bucket.
We chose to look into the newly released BitBucket Pipelines. It was a concept of creating your build pipeline as code into your repository. Simply putting a config file into the root directory and enabling the feature meant the build process would checkout, build and deploy your code based on your configuration.
Now we had the code and the deployment, we just needed something to tie it all together and make it all happen.
I wanted to standardise the way we deployed applications to these services. After much research, and based on our requirements, I identified the following options that we could reasonably use:
- Apex
- Chalice
- Custom Deployments
- Serverless
- Claudia.js
Apex
This was one of the first solutions we tried. It was good, but never really offered the same sorts of features that serverless does, like not providing support for API Gateway.
Chalice
Chalice was an emerging choice but there were some immediate concerns in order for adoption.
- It was tightly coupled with Python (used annotations)
- It was still in Preview and not recommended for Production Workloads
Custom Deployments
Lets be honest – I didn’t want to build a deployment solution from scratch. Although we could have used Cloudformation and Swagger files, one of my goals was to reduce administration building a custom solution was the least appealing option.
Serverless
Serverless ticked all our boxes.
- It covered deployment scenarios that we wanted to use
- Regular bug fixes and feature releases
- Simple to install
- It’s developed as vendor agnostic
Claudia.js
We found this after we decided on serverless, but it looks like it would’ve also been a good option for us.
The challenges of using Serverless
On the whole, AWS provides services that make building a Serverless environment very achievable. However, it’s not all puppy dogs and ice cream. There are some challenges and it’s worth taking a few things into consideration:
- Lambda has a 5-minute maximum execution time.
- Earlier versions of serverless handled Log Groups differently, meaning if you deployed using one version and then tried to deploy with a newer version, it would complain about it already existing.
- Unpredictable CPU allocations.
- Cold Endpoints/Lambda function – Need to be re-warmed if not used regularly.
Our Final Stack
We’re really happy with our final stack, it works for us. This is how we do business:
- Python and NodeJS Lambda functions
- DynamoDB + AutoScaling
- API Gateway
- S3 for static Website hosting
- Cloudfront for Web Distribution
- SNS, SQS and Cloudwatch for backend processing
- Serverless to build and deploy to AWS
- BitBucket + Pipelines as a repository and Build/Deploy Pipeline
- AWS for Infrastructure and Services

